Saturday, 1 December 2012

The Countdown Is On

I always loved chocolate advent calenders when I was a kid. There was something great about knowing that you were going to get a special little treat everyday, like mini-Christmas for 24 days. The only down-side was those little chocolates in those advent calenders were never that great.

Last year I wanted to make a calender and stock it full of better chocolates. I was thinking of using those magnetic spice tins. They would be big enough to hold a variety of treats, and I loved that I could put them on the fridge acting as Christmas decorations and a reminder of my special daily treat. The only problem was that the best price I could find for these containers was almost $10 for a set of six. $40 for an advent calender was a little too pricey for me.

So when I saw this pin I thought it would be the perfect solution.

 
I bought everything and assembled a calender in one night. The above pin provides a good explanation so I will not go into the steps (they are also pretty obvious), but here are my tips.


  1. I used the magnets from magnetic picture frames purchased at the Dollar Store to glue them on the back on the watchmaker's tins. So far they work perfectly. I cut them in 2" circles then super-glued them to the back of the tins.
  2. Since I have a 2" paper punch I use it to cut out circles of scrap-book paper. Since this is slightly smaller than the tin lid I needed to glue them in place. I use Mod Podge to cover the glass surface of the lid then placed the circles on top and smoothed out the bubbles. I suggest a fairly think layer of Mod Podge to best prevent bubbles. When I used a thinner layer they did not dry as clear.
  3. I also needed to pinch some of the lids to make them fit more tightly. But it is a simple solution that works well.

Monday, 19 November 2012

Map Quest

We have a bit of a map theme in our living room so of course I found loads of things that I wanted on Pintrest.


Source: etsy.com via Tanya on Pinterest
Source: designsponge.com via Tanya on Pinterest
 

As with any theme I try not to go over the top. I also like to keep my investment fairly low as I can be a little fickle and decide to change everything if  left alone too long on a Sunday afternoon (and because I can be a little cheap).

So I thought I would try this as a DIY project. And it was actually easier than I expected. The quality may not be the best, but from a distance it actually looks quite good.

If you want to give this a try this is what you need to do:

1. Find a  map of the area you want (I used google maps)
2. Create a digital copy of the image of the map (Ctrl + Print Screen for an online maps)
3. Paste the image in an editing program (I actually found Microsoft Word worked well)
4. Optional: adjust the image setting to enhance the lines for the roads
5. Flip the image so it is a reverse image.
6. Adjust the size and crop to the select the area you want.
7. Print the file on heavy weight paper (I used cardstock).
8. Using an x-acto knife, cut away all areas that are not roads.

9. Flip it over and frame.


It probably took me about 2 hours in total (truthfully more like 3 since I made a mistake and cut a few roads out on the first try). So it was fairly quick and easy to do. Though for more detailed cut-outs or more complicated areas the purchase price of inspiration maps seems quite good. And the quality is much better. However, for a quick weekend project I would suggesting giving this a try.

Tuesday, 4 September 2012

Happily ever after....

I haven't been up to much over the summer. With all the beautiful sunny days and warm summer nights my long to-do list did not seem to get any smaller. However, my care-free summer caught up with me quickly in September as my in-laws 40th anniversary quickly approached and we didn't have anything ready. Thankfully with the help (and reminders) from some wonderful friends of the happy couple we celebrated with a nice end of summer BBQ surprise partly.

I had gone to Pintrest to started gathering ideas back in the spring when we first thought to plan a party. I had it all planned out.....


But a week before the party I still had nothing ready and not a lot of time to go shopping (we also did not have any pictures of the couples so that ruled out my favourite ideas). So I started looking around the house to see what I had on hand that I could use for decorations.

I remembered one of my first pins:


This would be perfect! I had everything I needed on hand....except I didn't have any pictures. After some consideration I decided on a simple sign with "and they lived happily ever after.." It seemed perfect for a 40th anniversary, and would be great for photos.

I wasn't 100% sure of the technique above since I was not transferring a full picture. Looking around for other techniques and suggestions and found these:

Source: matsutakeblog.blogspot.com
Source: unexpectedelegance.com
Source: diddledumpling.blogspot.com

In the end it took a lot of trial and error, and a lot of clean up. I didn't find a technique that would work for me. Since I was working with what I had around the house I may not have been working with the best tools. I can't remember how old my Modge Podge is, but I am thinking my purchase was more like a decade then a few years ago. Also the paint had a bit of a glossy finish. I gave it a light sand, but that may have not been enough.


Modge Podge and rubbing paper off - did not work
Elmer's Glue method worked better (with Sharpie help)
- but I now need a new printhead for my printer

The Elmer's Glue method worked the best, though it gummed up my printer, and left a glue residue that I was not happy with. So I decided to scrap it and try an old-school carbon copy method. I printed off what I wanted, flipped the paper over then took a pencil and rubbed the back to leave the carbon behind (when you flip the paper back over and trace the letter it leaves a carbon imprint). But after I finished rubbing the pencil over the back I lifted up the paper and found the ink had rubbed off on my desk. So I tried again rubbing the mirror image words on my piece of painted wood. Success!
 
It came out light, but I coloured in it with the Sharpie and it looked great. This is similar to the water and rubbing method, just less smudgy. 


To add to the decorations I picked up some red balloons and napkins (the 40th is the ruby anniversary) and a few 40th items from a party store. Since my in-laws already had anniversary plates on display I decided to add to their collection by creating a 40th Anniversary plate guest book (approx $3 for the plate and $10 for 5 ceramic pain pens at Walmart).

Wednesday, 25 July 2012

Lettuce Have Fun!


So my pin projects have been put on hold with the nice summer weather (living in a place where we usually only have a 1-2 month summer at most you take advantage of any warm weather you get).

Last Friday as I was making a quick salad before heading out for the weekend I remembered this pin on re-growing lettuce and tossed the stub in a small bowl of water before heading out.

Easy as that!

When I arrive home a few days latter there was already lettuce sprouting. By Wednesday there were a few tiny leaves making me think this just may work.

5 Days Growth

It has only been a week so I am not sure how much lettuce I will get, but since the stub was going to be tossed anyway it was at least worth the try.  
Onions first purchased from
  store 2.5 months ago

As an update I had also tried to re-grown green onions with good success. As noted in this post the roots and onions started to get a little slimy when not rinsed often. They finally reach the point when the roots were getting too long and looked like the slime was taking over. Since the weather was now nice, and I have a small vegetable garden, I decided to try planting them outside. a few weeks later most of them are still growing (those that didn't make it looked as though they may have been pulled up by some local animals).

Tuesday, 5 June 2012

Growing Green Onions

When I saw this pin it was so perfect! Whenever I get green onions I find I only use 20% then the rest eventually die in my fridge. The idea is so simple that I couldn't believe I haven't been doing this for years.


You just take your remaining green onions and place them in a container with a little water and they continue to grow and provide fresh green onions whenever needed.

I first gave this a try over a month ago. The biggest problem was that they kept on growing and I wasn't using them fast enough. I had to trim them back  more that I was using them.

A week and a half ago I finally had a recipe that required a 1/2 cup of green onions and was able to use the full bunch for the first time since I bought them a month earlier.


1 1/2 weeks growing.


Conclusion: This works great. The onions grow fast and keep fresh for a long time. I have found that I need to drain the water and rinse the base of the onions at least once a week to keep them from getting slimy.

Even if this doesn't last forever it is well worth it as I have received at least 2X more onions then expected when I originally bought them

Saturday, 19 May 2012

Pegboard Broom Closet


I love pegboard. I love how it can easily be adapted to fit your current needs. I love that you can change the configuration of hooks, shelves and holders on a whim and do not have to worry about filling holes and creating new ones.I even love the style of it, with the little peg holes in perfect rows.

I have been waiting to use pegboard in the house for some time now. I had started to collect pins to get ideas of where it could go and how I could use it.


The opportunity finally arrived after an impromptu renovation of the basement stairwell (started with replacing the side-entrance tiles and ended up with patched and painted walls, and a new wall cap, and new handrail). So after removing the old and ugly hooks that were used to gather random items that found their way in the side door, we were left with a blank wall that needed something a little special. At the same time we need a broom closet. The kitchen didn't have a space for brooms and other items, and they often got lost in the basement among everything else that gets thrown there.

This was a perfect spot for pegboard. This often wasted space can be difficult to make functional with the sloped ceiling and narrow depth. But with pegboard each item can be arranged to fit the space.

For this project we required 2 sheets of mdf pegboard, trim (important for uneven walls), paint (I used what I had leftover from the living room) and a pegboard accessory kit. Luckily the kit came with spacers to help hang the pegboard and allow for space to insert the hooks. We also found similar small plastic spacers with other hardware.

Pegboard Broom Closest
Baskets to hold smaller items

Conclusion:

I love it. It was easy to install (though a little tricky to cut with the ceiling) and holds everything perfectly. We even have some extra space that I am thinking of adding the pegboard shelf. Everything is also easily accessible and easy to find.

Since we had extra leftover we even used it in other parts of the house.
Pegboard in Storage Closet
Pegboard Tools


This is also a cheap solution. Though I did not remember to keep my receipt, I think the whole project was around $40 (using leftover paint we had).

Friday, 11 May 2012

Greek Yogurt Chocolate Cake

I have seen a lot of posts lately for 2 ingredient cakes or other variations on the boxed cake recipes. Now, I have never found the regular 2-3 ingredient boxed cake recipes that difficult to make. So alternatives that offered shortcuts did not seem that exciting.

But I did end up saving this pin from Hungry Girl that contained a collection of these recipes. Not because I finally got tired of the 3-step cake mix, but I often find myself missing eggs, one of the 3 main ingredients needed. 

Or, as happened the other day, I have an ingredient that I need to use. After finding a container of Greek yogurt in the back of the fridge that I wanted to use I decided to give one of the recipes a try, Cake Mix + Fat-Free Greek Yogurt.

Result: Not surprisingly it does work. The cake was a little more moist than the regular version but was still a good result.


Conclusion: Not the best cake ever, but more than editable, and great if you need to use up some ingredients or in a pinch if you are missing oil, eggs or water.

Thursday, 10 May 2012

Backpack Storage

Our house has very little storage, and a lot of our DIY projects and renovations around the house are based on creating more and better storage solutions. I saw this pin a week or so ago and loved it. It provides multi-use storage and does not take up much room. But I really didn't have a place for it.

The front hall closest is one area that causes problems. We always seem to have more than we can fit in. Our recent problem is all of our bags for the gym and work. They pile up and often end up spilling out on to the floor.

Looking for a solution I remember this pin that offered a solution for keeping bags off the floor. Even more perfect I happened to already have the IKEA grundtal bar and hooks that were not being used.

So after gathering everything I needed I set to work, and 10 minutes later I had it installed and the bags off the floor.


Before
After


It may not be the final solution for our lack of front hall storage but it will hopefully keep our bags in order.

Monday, 30 April 2012

Good Clean Fun

I'm a liquid pump soap kind of girl. I can never seem to wrangle wet bars which often end up on the floor, or sliding around my counter. In the shower I will inevitably find the slippery buggers under foot, often while I have soap in my eyes, leading to some acrobatics that my body was not made for. However,  I do have a nice collection of bars of soap that I was given as presents that I want to use, I plan to use, because they just smell so good.
I received such gift a month ago. I loved the smell so much I would often stop in my bathroom to just smell the little bar wrapped up in its cute packaging. So when I saw the following tutorial on Pintrest I knew it would be the perfect thing to try next. I was going to turn my beautiful bar of soap into a gallon of liquid soap! I just looked so quick and easy.


Or so I thought.

I gathered everything I need. It actually took a few tried to find glycerin as I was looking in grocery store pharmacies (I was already there after all) but had no problem locating it in the first-aid section of a large pharmacy. The actual process was straight forward it only took a few minutes to prepare. I grated the soap, threw it in a pot with water and glycerin and let it dissolve. Since my bar of soap was 5oz instead of the 8oz in the original post on The Farmer's Nest I adjusted the other measurements accordingly (I knew all that math I learned in school would come in handy some day).

So after following all of the instructions, letting it cool overnight, giving it a stir, I ended up with.....soapy water.


Liquid soap looking a little too watery

It looked nothing like what the tutorial had promised. But since I knew the process was pretty basic I was certain that I should be able to get liquid soap out of this. To save my precious bar of soap I decided to concentrate the soapy water. I ended up letting it simmer for around an hour. After letting it cool and set it looked more like what I was expecting.

Waiting for second attempt at liquid soap to set

Of course I had let it concentrate a little too much so had to add a little more water back in and mix. But in the end I did end up with liquid soap. And after two days of heating the mixture the house smelled wonderful!

Conclusion:
I did not end up with a gallon of soap as in the tutorial. As was suggested this is likely since the soap I used was softer and required less water. I did manage to fill 2 soap bottles and refill a slightly larger one in my kitchen.

The soap does not seem to lather as much as commercial liquid soap, but this may be due to the original soap rather than the process of turning it into liquid. I was also not able to get the right consistency. It comes out a little snotty (sorry for the descriptive, it is the best I can think of). I will admit I did skip mixing it with an electric mixer in the end, and instead whisked it by hand. I also may not have added enough water back in.
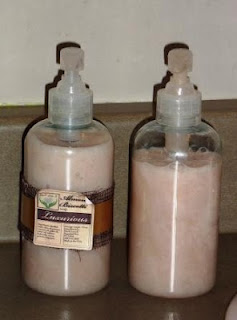


Homemade Liquid Soap
Finished Product
Since it is a very quick and easy process, and I have more bars of soap in the house, I will try it again. Next time I will start will half as much water as it is easier to add more water in the end than it is to concentrate it back down. I will also mix with an electric as instructed.

Monday, 23 April 2012

For the Love of Veggies

If you are at all like me you have a fridge full of limp veggies that you bought will all intentions of eating. You start off well, you did buy them with a plan to eat them after all, but leftovers get pushed to the back where it will eventually waste away, shrivel up, or turn into a pile of goo, to be remove the day you eventually get around to cleaning your fridge.

I do get pangs of regret as I toss out these forgotten veggies. This problem generally only happens in the winter months (which in Canada is from October to June) as I am able to select only as much as a need from my small, yet fairly productive, garden during the summer. The rest continues to grow waiting for the day when I need to return for some more.

With this in mind I have started to become interested in re-growing veggie from things you get at your local grocery store. This solves two problems for me: 1. I do not have to feel as bad about the shrivelled up veggies I am about to toss as part of it will continue to live on; 2. I am able to grow new vegetables that I can enjoy and only harvest as much as I need. It also helps that I can  be a little cheap, and this way I get 2 for the price of 1.

When I saw this pin on growing celery from the discarded end I wanted to give it a try next time I brought some home from the store. I enjoy celery, but it has to be #1 veggie that is destined to never leave my fridge looking the same as when it went in.


About 2 weeks ago the opportunity arrive. After I finished cutting up what I needed, and placing the remainder in the fridge, I placed the bottom piece in a bowl with water. It probably sat there for about a week before I had time to think about it again. By this time I could see a few little roots develop. Since it is not fit to plant outside here in April I decided to plant it indoors with the plan to transplant it into the garden once it is warm enough.

Re-growing Celery

And if you were wondering, yes the rest of the celery that I had placed in the fridge is still there waiting to be tossed.

Tuesday, 17 April 2012

Chocolate Avocado Cupcakes with Cauliflower Icing....yum?

After the success of the Guinness Chocolate cupcakes I decided to go out on a limb again with these avocado cauliflower cupcakes.


I wasn't actually looking for odd cupcake combinations to try. It happened after finding a pin how to decorate cupcakes. My friend sent me a message about how she was trying to focus on eating healthy when she was distracted by my pin that appeared on her Facebook news feed:


So to balance everything out I decided to look for healthier cupcake options, and I came across this recipe for Chocolate Avocado and Cauliflower cupcakes. When I originally pin it I did not actually intend to give it a try. But after I kept on seeing it on my Pintrest and seeing the interest in it I decided to give it a shot. 

The cake turned out great. It was a nice dense chocolate cake almost like a brownie (if you like a fluffy cake like you get with boxed mixed this is not for you) and once cool I was not able to taste the avocado. The batter is very thick and will need to be scooped into the cake tins as it will not poor. I may also have over-cooked it a bit as a toothpick will not come out clean when cooked like other cakes (I did not trust and left them in the oven for an extra 3-5min).

On the other hand the icing was a complete flop for me. The recipe posted on the Sweet Life is from Jessica Seinfeld's Deceptively Delicious and calls for 2 Tbsp of vanilla extract. I am now questioning if this should be 2 tsp as my icing turned out to be a very runny mess and would not stay on top of the cupcakes. My cauliflower may also have not been drained well enough after it was steamed. Either way I scrapped the icing and just went with a standard buttercream.

These were not nearly as good as the Guinness cupcakes but I will likely make them again. Hopefully I can get the cauliflower icing to work next time.

Chocolate Avocado

Are there any other strange cupcake combinations that you enjoy?

img.noborder { border: 0px;-moz-box-shadow: 0px 0px 0px rgba(0, 0, 0, .0); -webkit-box-shadow: 0px 0px 0px rgba(0, 0, 0, .0);box-shadow: 0px 0px 0px rgba(0, 0, 0, .0); border-radius: 0px 0px 0px 0px; background: none; }