Showing posts with label Things To Do Someday. Show all posts

Monday, 10 February 2014

Heart on a String

After the success of my last sewing project I was ready to tackle another one. Well....not exactly ready. It looked as though I may have broken my sewing machine after I was finished the bow tie project. And like any good sewer I had wrestled free the last thing I was trying to make, tossed it out, and stuck the sewing machine in a closet in the hopes it would think about what it had done and correct itself.

But I had this cute heart garland pinned for awhile and thought it would be a perfect project for a low skill sewer like me. I even had everything already on hand so it would be a no cost project. The only problem was that the sewing machine and I haven't talked since December and I was thinking it wouldn't be happy.

I was right.

My problem was threads that were getting pulled down and caught up in the lower bobbin area - which after extensive Googling I found out is called the birds nest. This is appropriate since every time I tried to sew something I ended up with a nest of threads wrapped around this whole area.

So I took everything apart, clean and oiled my machine, and re-threaded.

Same problem.

I adjusted the top and lower tension.

No difference.

I turned it off and left it sitting on the kitchen table to think about what it had done.

I think it laughed at me.

In a last ditch effort the next day I re-threaded it again adjusting how the top thread spool was
secured. And for some reason it worked.

Wrong
Right
 
Once I had everything working this project was unbelievably easy. The instructions here are great so I wont go over them all again.

Because I was working with stuff I already had around the house, and I don't follow instructions exactly, I did make some changes.

1. My strips were 2 inches wide - it worked better with my scrap pieces of felt and the size of felt balls I had (they were 1/4")

2. I didn't have a marking pen - so I just used a scrap of paper as a template to cut my hearts

3. I cut my heart to be 1/2 inch thick (instead on 3/4) - it just worked better with the smaller height and smaller felt balls


As I said before this was a super easy project and required basically no sewing skills. If you want to give this a try I would suggest the following

  • Mark with a small dot where you will thread the hearts. When you are marking the cut lines (which would probably result is more uniform sizes then my template method) mark with a small dot where you will thread the hearts. you can mark on the inside - or the outside which will be covered by the felt ball. I eyeballed it and the hearts on my garland are a slightly different heights and depths.
  • Using clear fishing line. I lost my fishing line (lost, because since I haven't been fishing in 20years I know I didn't use the enormous spool up) so I used while thread instead. I find this bunches and tangles a lot and is more noticeable.
  • Make extra hearts. Since they are so easy to make you might as well make more while you are at it. I would have liked to have a longer garland but I already put everything away when I was stringing the hearts so just left it
I think this would be a great project for kids who are just learning to use a sewing machine. It is also a quick and easy project if you wanted to add some last-minute decorations - and would look great using a variety of colours and would be cute a decoration for a shower or birthday part (not just for Valentines Day).


Sunday, 26 January 2014

Tie One On


This past Christmas I had 3 new boys in my life that I wanted to give something a little special to. I had saved this pin awhile ago - before any of the boys arrived - and thought it would be perfect!

This idea was too cute and it was something simple that I could make for them myself. And simple was important to me when it comes for sewing since my skills are less than perfect. By less than perfect, I mean that I have a hate-hate relationship with my sewing machine.


The first step was to gather everything I needed.

  • 3 sets of onesies in different sizes (I was making 3 set for 3 different boys) so the little guys could grow into them
  • Sew-on snaps
  • Fabric and coordinating thread
For the fabric I purchased two stacks of coordinated fabric from Walmart.  I think they are meant for quilts - but there were perfect for this project. I went with a puppy theme (what little boy doesn't love puppies?) and a Christmas theme.


To make the bow ties I pretty much followed the instructions int he original pin.
I cut the fabric into a set of bigger strips (approx. 5" x 9") and smaller strips (approx 1"x 2") - in the end I could have made them a little smaller since I trimmed them down a bit after. The actual size can vary and will depend on the size of the shirt on onesie. Since I was  making them to fit on three different sized onesies I settled on a finished size of 4" x 2" and found it worked well.

The larger strips were folded in half length-wise (finished sides together) and sewn down the raw edge.

Fold length-wise and sew down raw edge
Finished bow ties were 4" x 2"


Then I turned them right-side out and sewed the ends together. The same process is then followed for the smaller strips. These smaller strips need to be large enough to fit over the larger strips but small enough to to gather the material and give the appearance of a knot.

Sew ends together
 
Fold the larger strip to make it easier to slide the "knot" over

The longest part of this project was sewing the snaps onto the bow ties and onesies. If I make these again I would try to find grommet snaps to use instead - though the sew-on snaps will make it easier to move the snaps on the onesie or shirt over to a new one.

 
In the end this project turned out really cute.  And I only got into a few fights with my sewing machine.
 

In conclusion this was a simple and easy project, and everyone who receive one loved them. If you want to give this project a try here are a few tips:
  1. As mentioned above I would suggest using grommet snaps if you are making multiple sets like I was
  2. It is important for the spacing of the snaps to be the same for all of the bow ties on on the shits/onesies - measure and mark where the snaps will go when you can lie the large piece flat before you put the small "knot" on.
  3. I placed the bow ties on the onesies a few inches below the collar so they would not be in the little guys faces and hopefully avoid some drips and spills.


Monday, 30 April 2012

Good Clean Fun

I'm a liquid pump soap kind of girl. I can never seem to wrangle wet bars which often end up on the floor, or sliding around my counter. In the shower I will inevitably find the slippery buggers under foot, often while I have soap in my eyes, leading to some acrobatics that my body was not made for. However,  I do have a nice collection of bars of soap that I was given as presents that I want to use, I plan to use, because they just smell so good.
I received such gift a month ago. I loved the smell so much I would often stop in my bathroom to just smell the little bar wrapped up in its cute packaging. So when I saw the following tutorial on Pintrest I knew it would be the perfect thing to try next. I was going to turn my beautiful bar of soap into a gallon of liquid soap! I just looked so quick and easy.


Or so I thought.

I gathered everything I need. It actually took a few tried to find glycerin as I was looking in grocery store pharmacies (I was already there after all) but had no problem locating it in the first-aid section of a large pharmacy. The actual process was straight forward it only took a few minutes to prepare. I grated the soap, threw it in a pot with water and glycerin and let it dissolve. Since my bar of soap was 5oz instead of the 8oz in the original post on The Farmer's Nest I adjusted the other measurements accordingly (I knew all that math I learned in school would come in handy some day).

So after following all of the instructions, letting it cool overnight, giving it a stir, I ended up with.....soapy water.


Liquid soap looking a little too watery

It looked nothing like what the tutorial had promised. But since I knew the process was pretty basic I was certain that I should be able to get liquid soap out of this. To save my precious bar of soap I decided to concentrate the soapy water. I ended up letting it simmer for around an hour. After letting it cool and set it looked more like what I was expecting.

Waiting for second attempt at liquid soap to set

Of course I had let it concentrate a little too much so had to add a little more water back in and mix. But in the end I did end up with liquid soap. And after two days of heating the mixture the house smelled wonderful!

Conclusion:
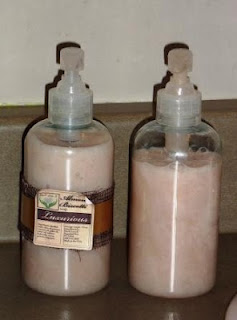
I did not end up with a gallon of soap as in the tutorial. As was suggested this is likely since the soap I used was softer and required less water. I did manage to fill 2 soap bottles and refill a slightly larger one in my kitchen.

The soap does not seem to lather as much as commercial liquid soap, but this may be due to the original soap rather than the process of turning it into liquid. I was also not able to get the right consistency. It comes out a little snotty (sorry for the descriptive, it is the best I can think of). I will admit I did skip mixing it with an electric mixer in the end, and instead whisked it by hand. I also may not have added enough water back in.


Homemade Liquid Soap
Finished Product
Since it is a very quick and easy process, and I have more bars of soap in the house, I will try it again. Next time I will start will half as much water as it is easier to add more water in the end than it is to concentrate it back down. I will also mix with an electric as instructed.
img.noborder { border: 0px;-moz-box-shadow: 0px 0px 0px rgba(0, 0, 0, .0); -webkit-box-shadow: 0px 0px 0px rgba(0, 0, 0, .0);box-shadow: 0px 0px 0px rgba(0, 0, 0, .0); border-radius: 0px 0px 0px 0px; background: none; }