Showing posts with label Play Date. Show all posts

Friday, 26 July 2013

Sunny with a chance of rainbows

This year I was happy to once again help my good friend plan a birthday party for a very special girl. After she decided on a rainbow themed second birthday party I started pinning ideas right away.

I found a lot of great ideas, but since the party was to be simple and low-key we choose a few of our favourites and planned a perfect summer time gathering.

Here are a few highlights of the day:


 Rainbow Cake


Decorations


Bubble Party Favours

Food
 
 
One of the great things about the rainbow theme is that it is really easy and quick to put together. All you need is a variety of colours and you have a rainbow party. One of the best pins I found was for this site http://catchmyparty.com/blog/free-rainbow-birthday-printables-from-printabelle which have free party printables. I used it for the water bottles, and a few other things I did not have pictures of.  It also has many other great party theme printables.
 
There are a lot more great ideas that we didn't have time to try, but if you are thinking of a rainbow party check out my pin board and have fun planning your own perfect party.


The sign of a great party


Sunday, 12 May 2013

Happy Mother's Day

During my last play date with Kate I had decided to spend some time making a Mother's Day gift for Kate's mom. I was a little worried about the results of our homemade finger paint project so I wanted a back-up.

When I saw this fingerprint necklace I thought it would be perfect!


It is so simple and sweet. Would be super easy to make, and as a huge bonus I had everything on hand.

Before Kate arrive I opened an old package of white Fimo I had (and when I say old, the Fimo was part of a bead making kit I receive when I was around 14....which is almost 20 years ago!) and I softened it up my kneading it for a bit. Then I rolled a few small balls and set aside for latter.

After our finger painting was complete I just flattened out the balls out and helped Kate press her finger in the middle. It worked great!

I set everything aside and we went for a walk in the park.

Fingerprints

Later that afternoon (after Kate went home) I baked them in the oven.....and burnt them. It may have been the age of the Fimo, or the general baking time didn't apply since they were so small, but most likely it was because I placed them on tinfoil since I didn't like the idea of them baking on a cookie sheet I actually use for cookies. When the white Fimo burns it turns purple and splotchy. But the still looked so cute so I set the aside and tried to figure out if there was a way to fix it.

In the end I decided to try to give the a coat of paint to see if that hid the purple colour. The only problem was if the paint was too think it would fill in the finger print and defeat the point of the whole project.

In the end I used paint markers that I already had for the Anniversary Plate. I painted each pendent, let it dry for about 30 seconds then dabbed it with some paper towel. After the paint dried I thought it looked great.


I added some jump rings and a clip to turn the larger one into a key chain charm, and a chain to the other to make a long pendent necklace or a wrap bracelet.

Fingerprint Key Chain Charm
Fingerprint Pendant


Conclusion: This is such a simple craft to do with young kids (even a baby could do it) that looks great. I have seen similar ideas for Christmas ornaments that would be easy to make and family would love to receive as gifts.

Saturday, 4 May 2013

Play Date with Kate

Finger Paints!

Last month I had a play date with my favourite little girl (I can say that as I only have nephews). Since we don't have kids of our own our house is lacking in kid friendly toys. So when I have a play date I usually have to plan ahead - especially now as Kate gets older she may figure out a plastic spatula and a paper towel tube is not a toy...well at least it can't be every time.
Source: www.huckleberrylove.com
via Tanya on Finger Paint

I wanted to try painting, however since Kate is still at the age where she likes to try and eat everything I was hesitant about buying finger paints from a store.Now since Kate isn't my kid I can be a little over protective. It is one thing to make your own kid sick, let them fall and bruise, or run around in dirty clothes, but it is another thing when you have to return the kid to their parents who trusted you to be responsible for their child for a few short hours. And I'm not judging here, if I had kids I am sure they would be the dirtiest, sickest, most bruised kids on the block.

So after some searching I found this recipe that looked simple and seemed to make a nice vibrant paint. And best of all it was editable - though (personally) not appetizing.

The finger paint has a jelly texture which make the colours a little transparent so the colours were not as vibrant as I expected, and I really wanted strong vibrant colours. Checking the recipe again to see if I did anything wrong I notices they used gel food colouring and I had used liquid. I tried adding gel and found it did make a difference. 

After following the instructions (and using gel colour) I ended up with this:


Conclusion: The paint was super easy to make and Kate loved painting with it, and eating some of it. Though even with the gel dye (that I would totally recommend) it is still a gel paint and not as opaque as I was looking for - it will never quite be the same as commercial finger paint.


Time to Paint
Source: www.astimeflies.ca
via Tanya on Pinterest

After seeing this pin I thought it would be perfect for our play date and could be a great Mother's Day craft Kate and I could do for her hard working mother.... and a perfect use for the new finger paint.

Even though I would have like more concentrated colour, in the end I decided to use it for the Mother's Day project anyway. Kate still likes to put new things in her mouth so I wanted to use something that I knew what was in it.


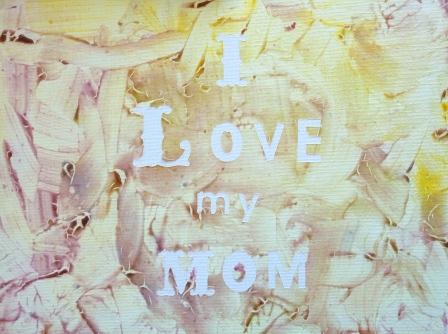
Instead of using the tape to spell out words I used letter stickers that I had.


Because of the gel paint I also painted a basecoat so there would be enough contrast when I removed the stickers.


Then Kate did a wonderful job of painting!


I actually had a hard time removing the stickers from the the small canvas. I'm not sure if it was the canvas, or the paint glued them on. But it worked well for the larger (stiffer) canvas, which luckily was the Mother's Day one.


What do you think? Will Kate be an artist some day?

Conclusion: This was a fun and super easy project. As you can tell the paint was put on pretty think so cracked a bit when it dried. It may help to limit the amount of paint used and/or help spread it around a bit. I am happy wit how it turned out and will include some pictures I took of Kate making it with the gift.
img.noborder { border: 0px;-moz-box-shadow: 0px 0px 0px rgba(0, 0, 0, .0); -webkit-box-shadow: 0px 0px 0px rgba(0, 0, 0, .0);box-shadow: 0px 0px 0px rgba(0, 0, 0, .0); border-radius: 0px 0px 0px 0px; background: none; }